LogoLogo
Go to Syntho.AI
English
English
  • Welcome to Syntho
  • Overview
    • Get started
      • Syntho bootcamp
        • 1. What is Syntho?
        • 2. Introduction data anonymization
        • 3. Connectors & workspace creation
        • 4. PII scan
        • 5. Generators
          • Mockers
          • Maskers
          • AI synthesize
          • Calculated columns
          • Free text de-identification
        • 6. Referential integrity & foreign keys
        • 7. Workspace synchronization & validation
        • 8. Workspace & user management
        • 9. Large workloads​
        • 10. Data pre-processing
        • 11. Continuous Success
      • Prerequisites
      • Sample datasets
      • Introduction to data generators
    • Frequently asked questions
  • Setup Workspaces
    • View workspaces
    • Create a workspace
      • Connect to a database
        • PostgreSQL
        • MySQL / MariaDB
        • Oracle
        • Microsoft SQL Server
        • DB2
        • Databricks
          • Importing Data into Databricks
        • Hive
        • SAP Sybase
        • Azure Data Lake Storage (ADLS)
        • Amazon Simple Storage Service (S3)
      • Workspace modes
    • Edit a workspace
    • Duplicate a workspace
    • Transfer workspace ownership
    • Share a workspace
    • Delete a workspace
    • Workspace default settings
  • Configure a Data Generation Job
    • Configure table settings
    • Configure column settings
      • AI synthesize
        • Sequence model
          • Prepare your sequence data
        • QA report
        • Additional privacy controls
        • Cross-table relationships limitations
      • Mockers
        • Text
          • Supported languages
        • Numeric (integer)
        • Numeric (decimal)
        • Datetime
        • Other
      • Mask
        • Text
        • Numeric (integer)
        • Numeric (decimal)
        • Datetime
        • UUID
      • Duplicate
      • Exclude
      • Consistent mapping
      • Calculated columns
      • Key generators
        • Differences between key generators
      • JSON de-identification
    • Manage personally identifiable information (PII)
      • Privacy dashboard
      • Discover and de-identify PII columns
        • Identify PII columns manually
        • Automatic PII discovery with PII scanner
      • Remove columns from PII list
      • Automatic PII discovery and de-identification in free text columns
      • Supported PII & PHI entities
    • Manage foreign keys
      • Foreign key inheritance
      • Add virtual foreign keys
        • Add virtual foreign keys
        • Use foreign key scanner
        • Import foreign keys via JSON
        • Export foreign keys via JSON
      • Delete foreign keys
    • Validate and Synchronize workspace
    • View and adjust generation settings
  • Deploy Syntho
    • Introduction
      • Syntho architecture
      • Requirements
        • Requirements for Docker deployments
        • Requirements for Kubernetes deployments
      • Access Docker images
        • Online
        • Offline
    • Deploy Syntho using Docker
      • Preparations
      • Deploy using Docker Compose
      • Run the application
      • Manually saving logs
      • Updating the application
    • Deploy Syntho using Kubernetes
      • Preparations
      • Deploy Ray using Helm
        • Upgrading Ray CRDs
        • Troubleshooting
      • Deploy Syntho using Helm
      • Validate the deployment
      • Troubleshooting
      • Saving logs
      • Upgrading the applications
    • Manage users and access
      • Single Sign-On (SSO) in Azure
      • Manage admin users
      • Manage non-admin users
    • Logs and monitoring
      • Does Syntho collect any data?
      • Temporary data storage by application
  • Syntho API
    • Syntho REST API
Powered by GitBook
On this page
  • Introduction
  • Kubernetes (Helm chart)
  • Docker Compose
  • Username and password login
  • Single Sign-On
  • Limitations

Was this helpful?

  1. Deploy Syntho
  2. Manage users and access

Single Sign-On (SSO) in Azure

Syntho beta feature

Introduction

To set up Single Sign-On (SSO), adjustments will have to be made to the application called backend. The exact place where you need to make changes will depend on your method of deployment (Kubernetes or Docker Compose).

Kubernetes (Helm chart)

The mentioned environment variables can be added to the Helm chart under the YAML path of backend.env. An example of this is:

backend:
  env:
    SSO_PROVIDER: Azure
    SSO_CLIENT_ID: <your-client-id>
    SSO_CLIENT_SECRET: <your-client-secret>
    SSO_TENANT: <Azure Tenant ID>
    EMAIL_LOGIN_ENABLED: True

Docker Compose

In the case of using Docker Compose, the Docker Compose file will need to be adjusted. The backend application can again be adjusted here, in this case, additional environment variables will need to be added directly to the existing list. An example of this:

version: '3'

services:
  backend:
    image: ${BACKEND_IMAGE}
    restart: on-failure
    environment:
      ...
      SSO_PROVIDER: Azure
      SSO_CLIENT_ID: <your-client-id>
      SSO_CLIENT_SECRET: <your-client-secret>
      SSO_TENANT: <Azure Tenant ID>

Username and password login

By default, Syntho users can log in using their username and password. To disable logging in with username and password, set the environment variable USERNAME_PASSWORD_LOGIN_ENABLED to False.

Single Sign-On

Syntho supports signing in using external identity providers. Use the provider-specific documentation for setting up SSO for your identity provider or use the OpenID Connect provider in case your provider is not listed below.

OpenID Connect

Consult the documentation of your identity provider to configure access by external applications.

When configuring access for Syntho, configure the following, the callback URL is https://<my-syntho-domain>/api/v1/oidc/callback/. The callback URL is also known as the issuer URL or redirect URL.

Provide the following environment variables when deploying Syntho:

  • SSO_PROVIDER=generic

  • SSO_CLIENT_ID=<your-client-id>

  • SSO_CLIENT_SECRET=<your-client-secret>

  • SSO_AUTHORIZATION_ENDPOINT=<your-authorization-endpoint>

  • SSO_TOKEN_ENDPOINT=<your-authorization-endpoint>

  • SSO_USER_ENDPOINT=<your-user-endpoint>

  • SSO_JWKS_ENDPOINT=<your-jwks-endpoint>

Azure

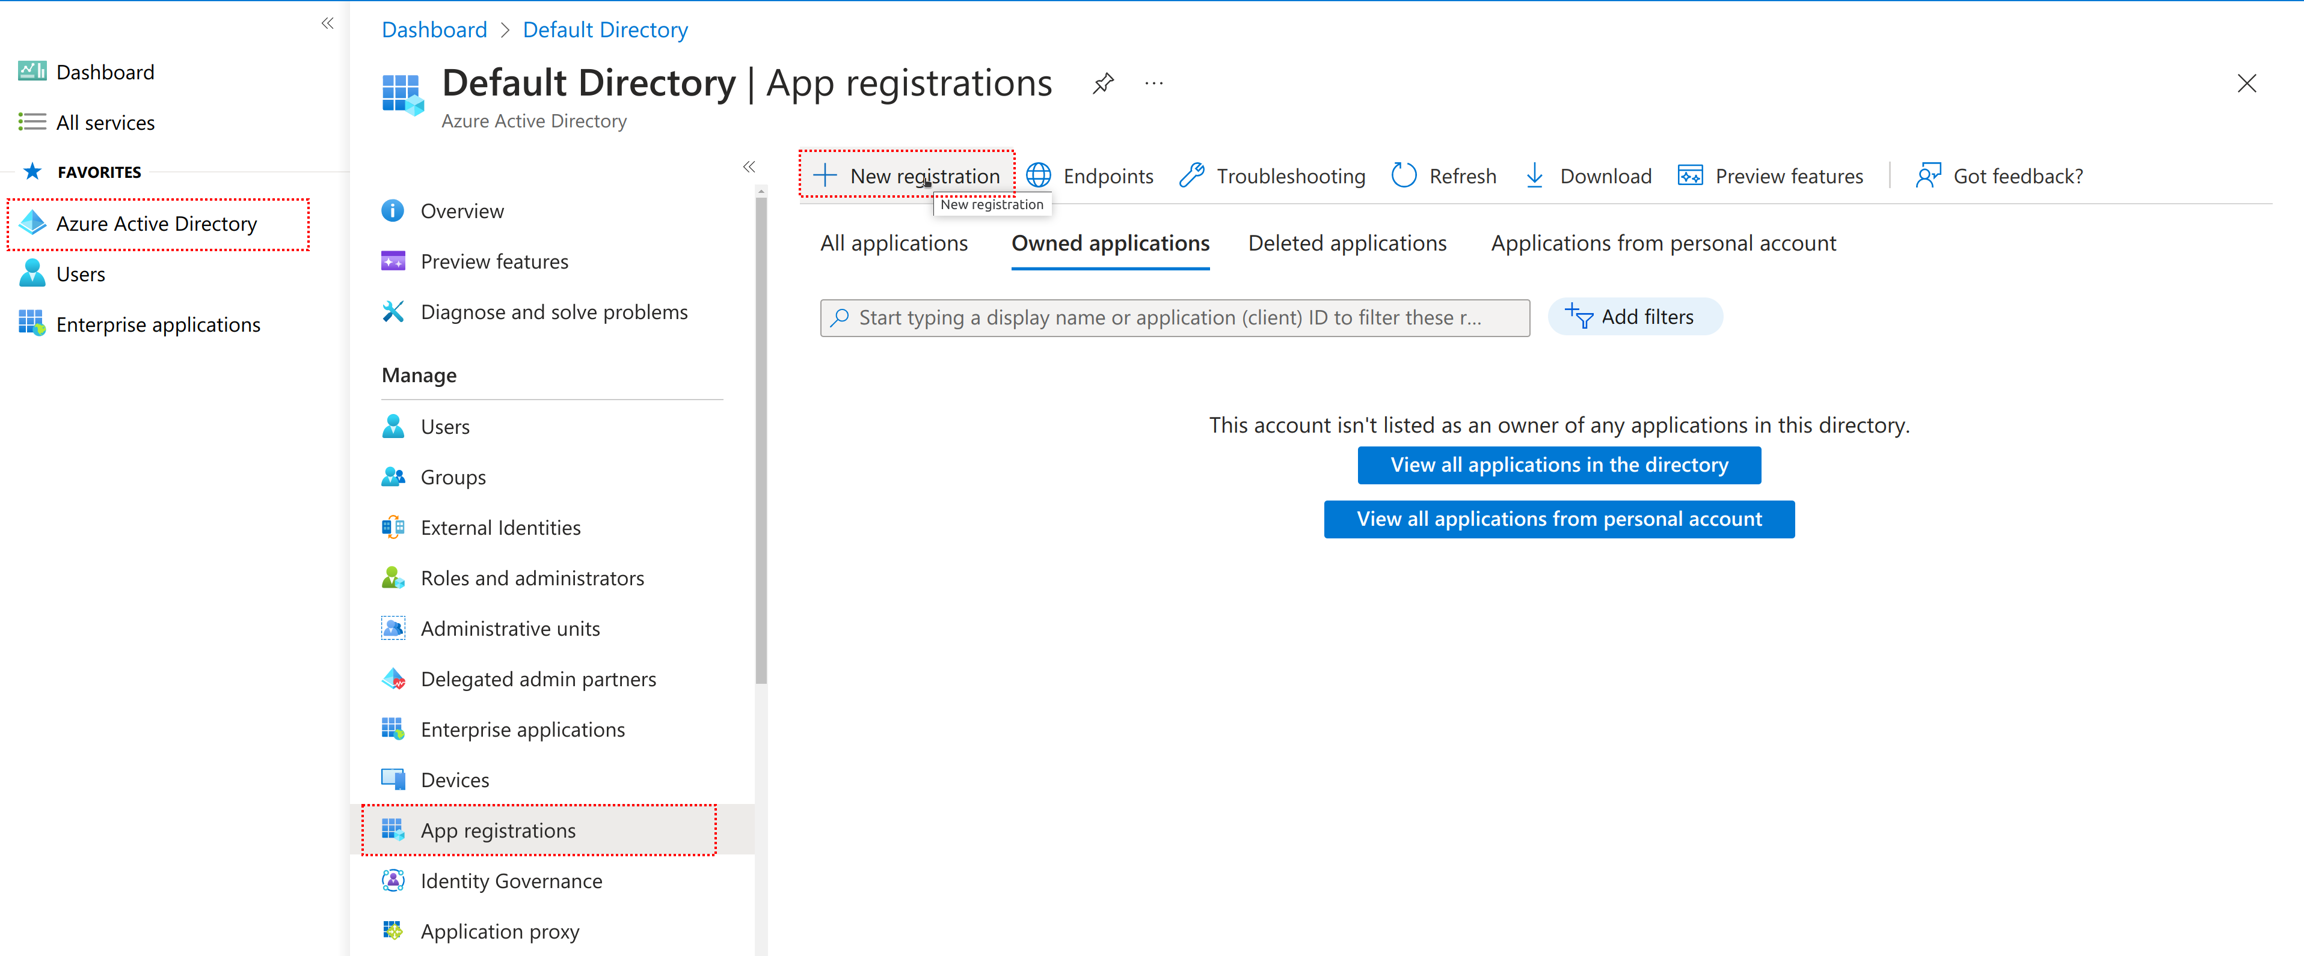
  1. Select Azure Active Directory, then go to App registrations and select New registration

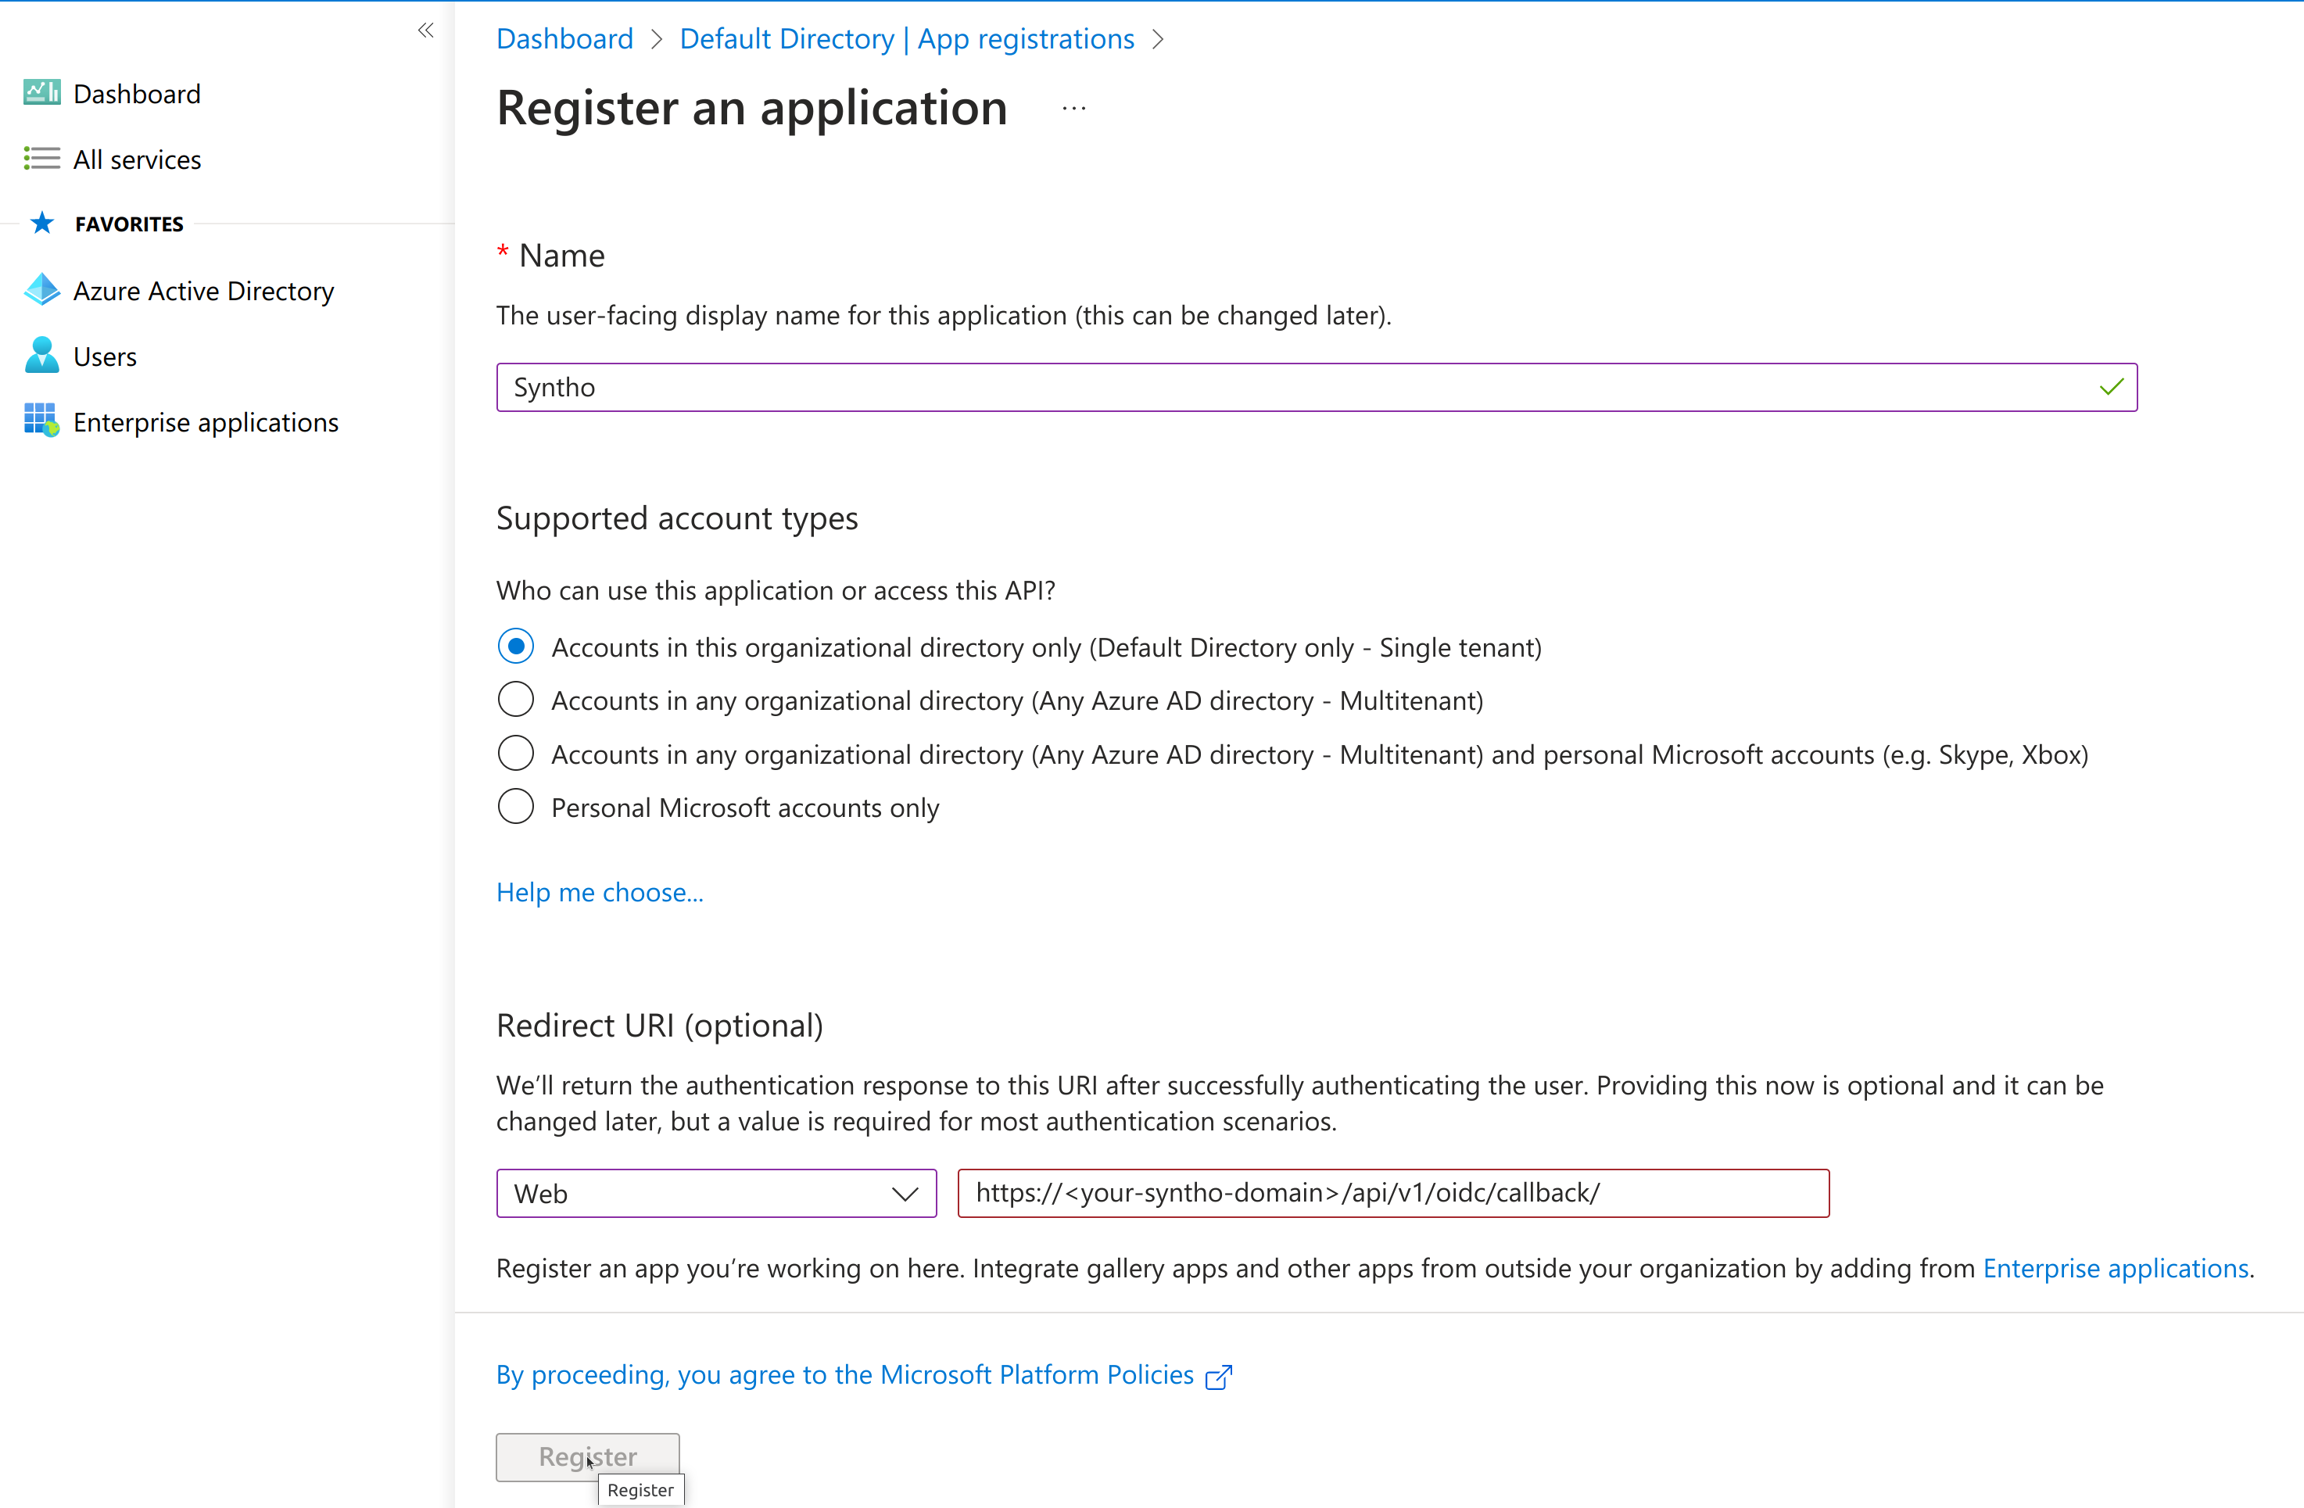
  1. Enter a name, for example Syntho. For Redirect URI, select Web and enter the url that points to the /api/v1/oidc/callback/ endpoint on your Syntho deployment.

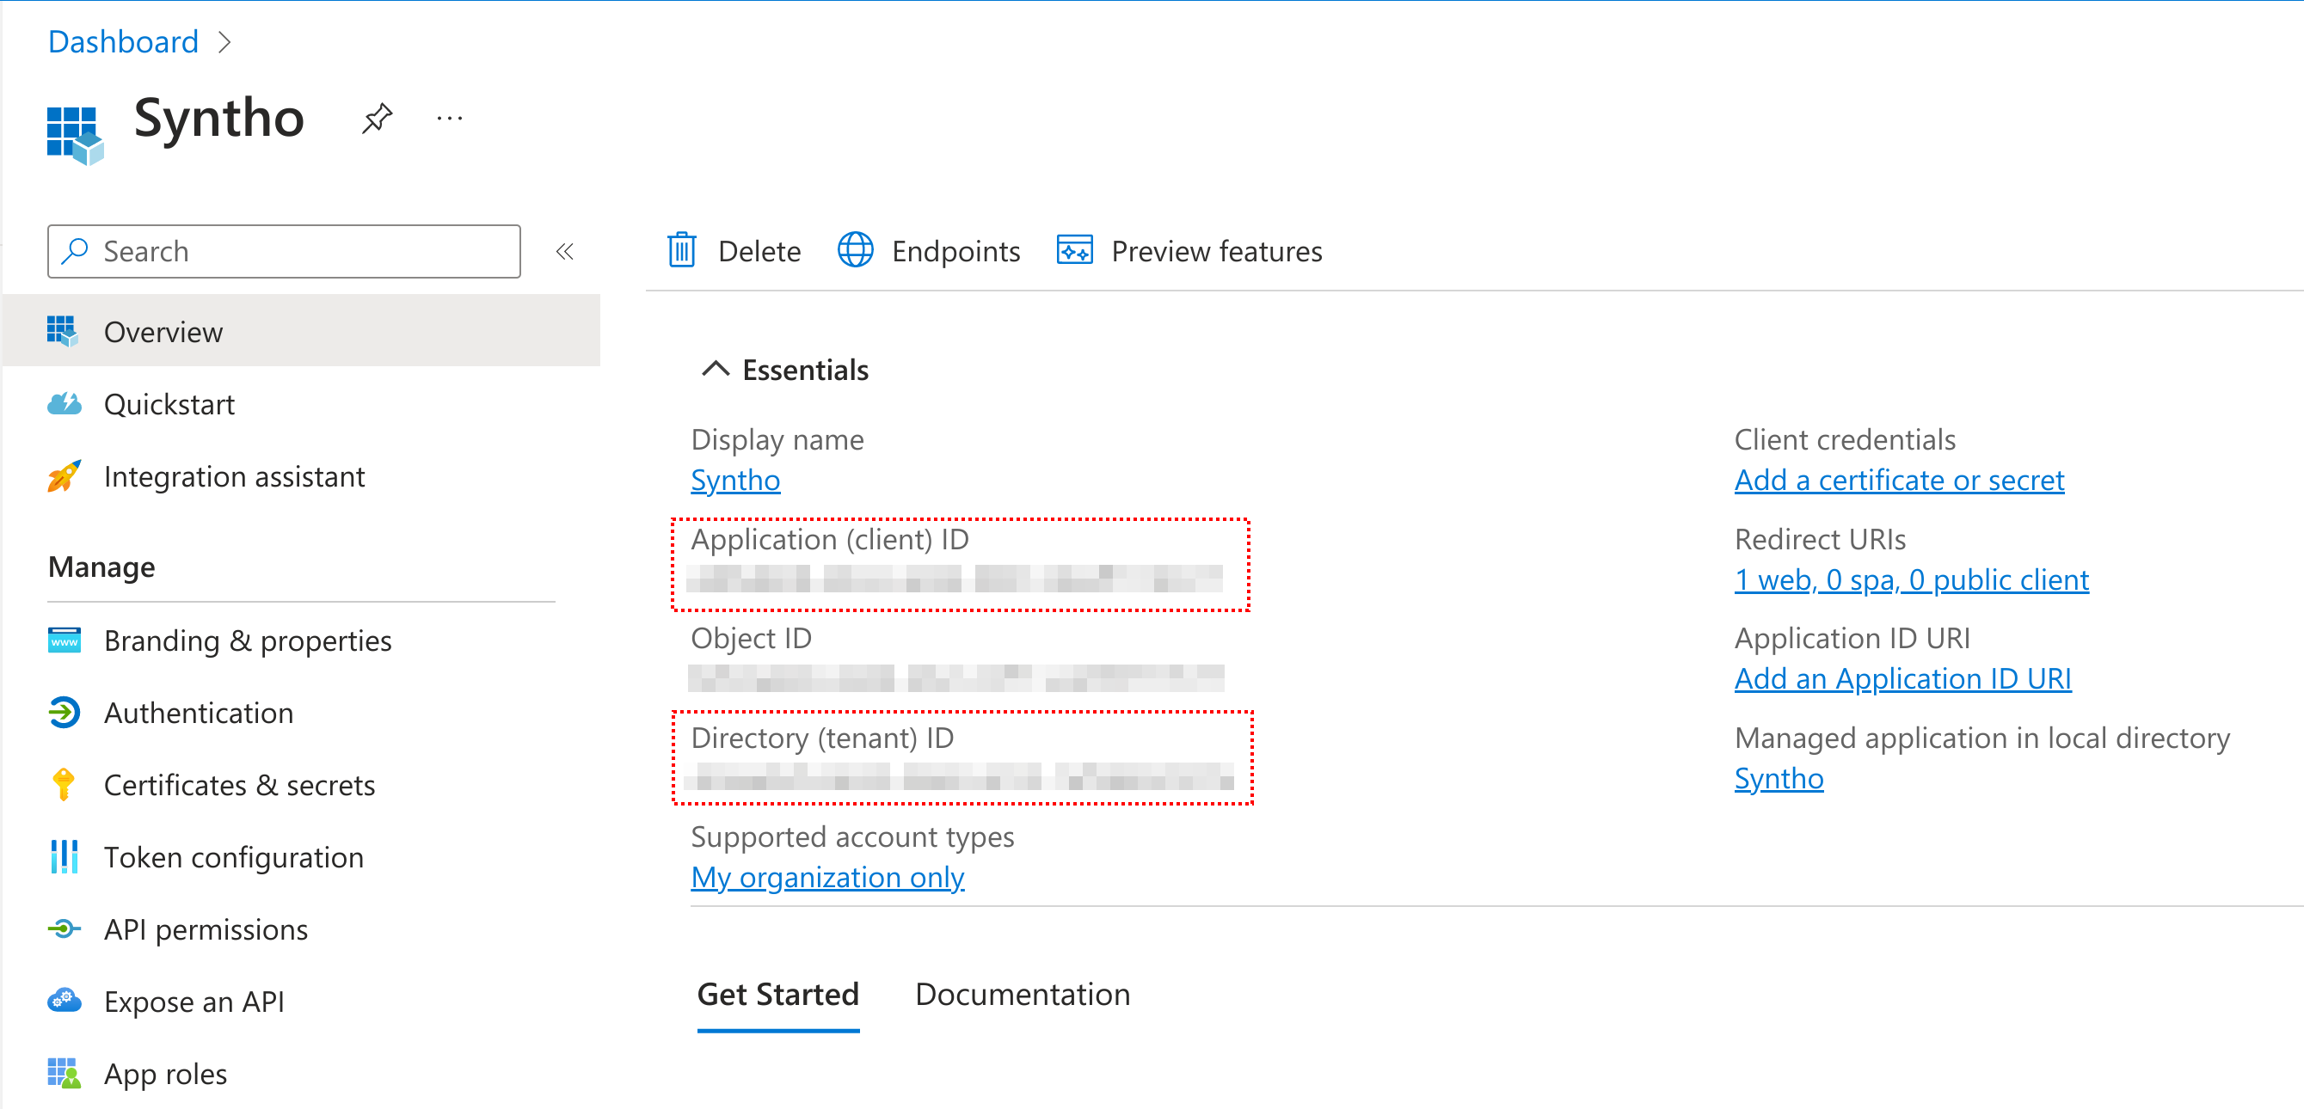
  1. Copy the "Application (client) ID" and "Directory (tenant) ID", these values are used later.

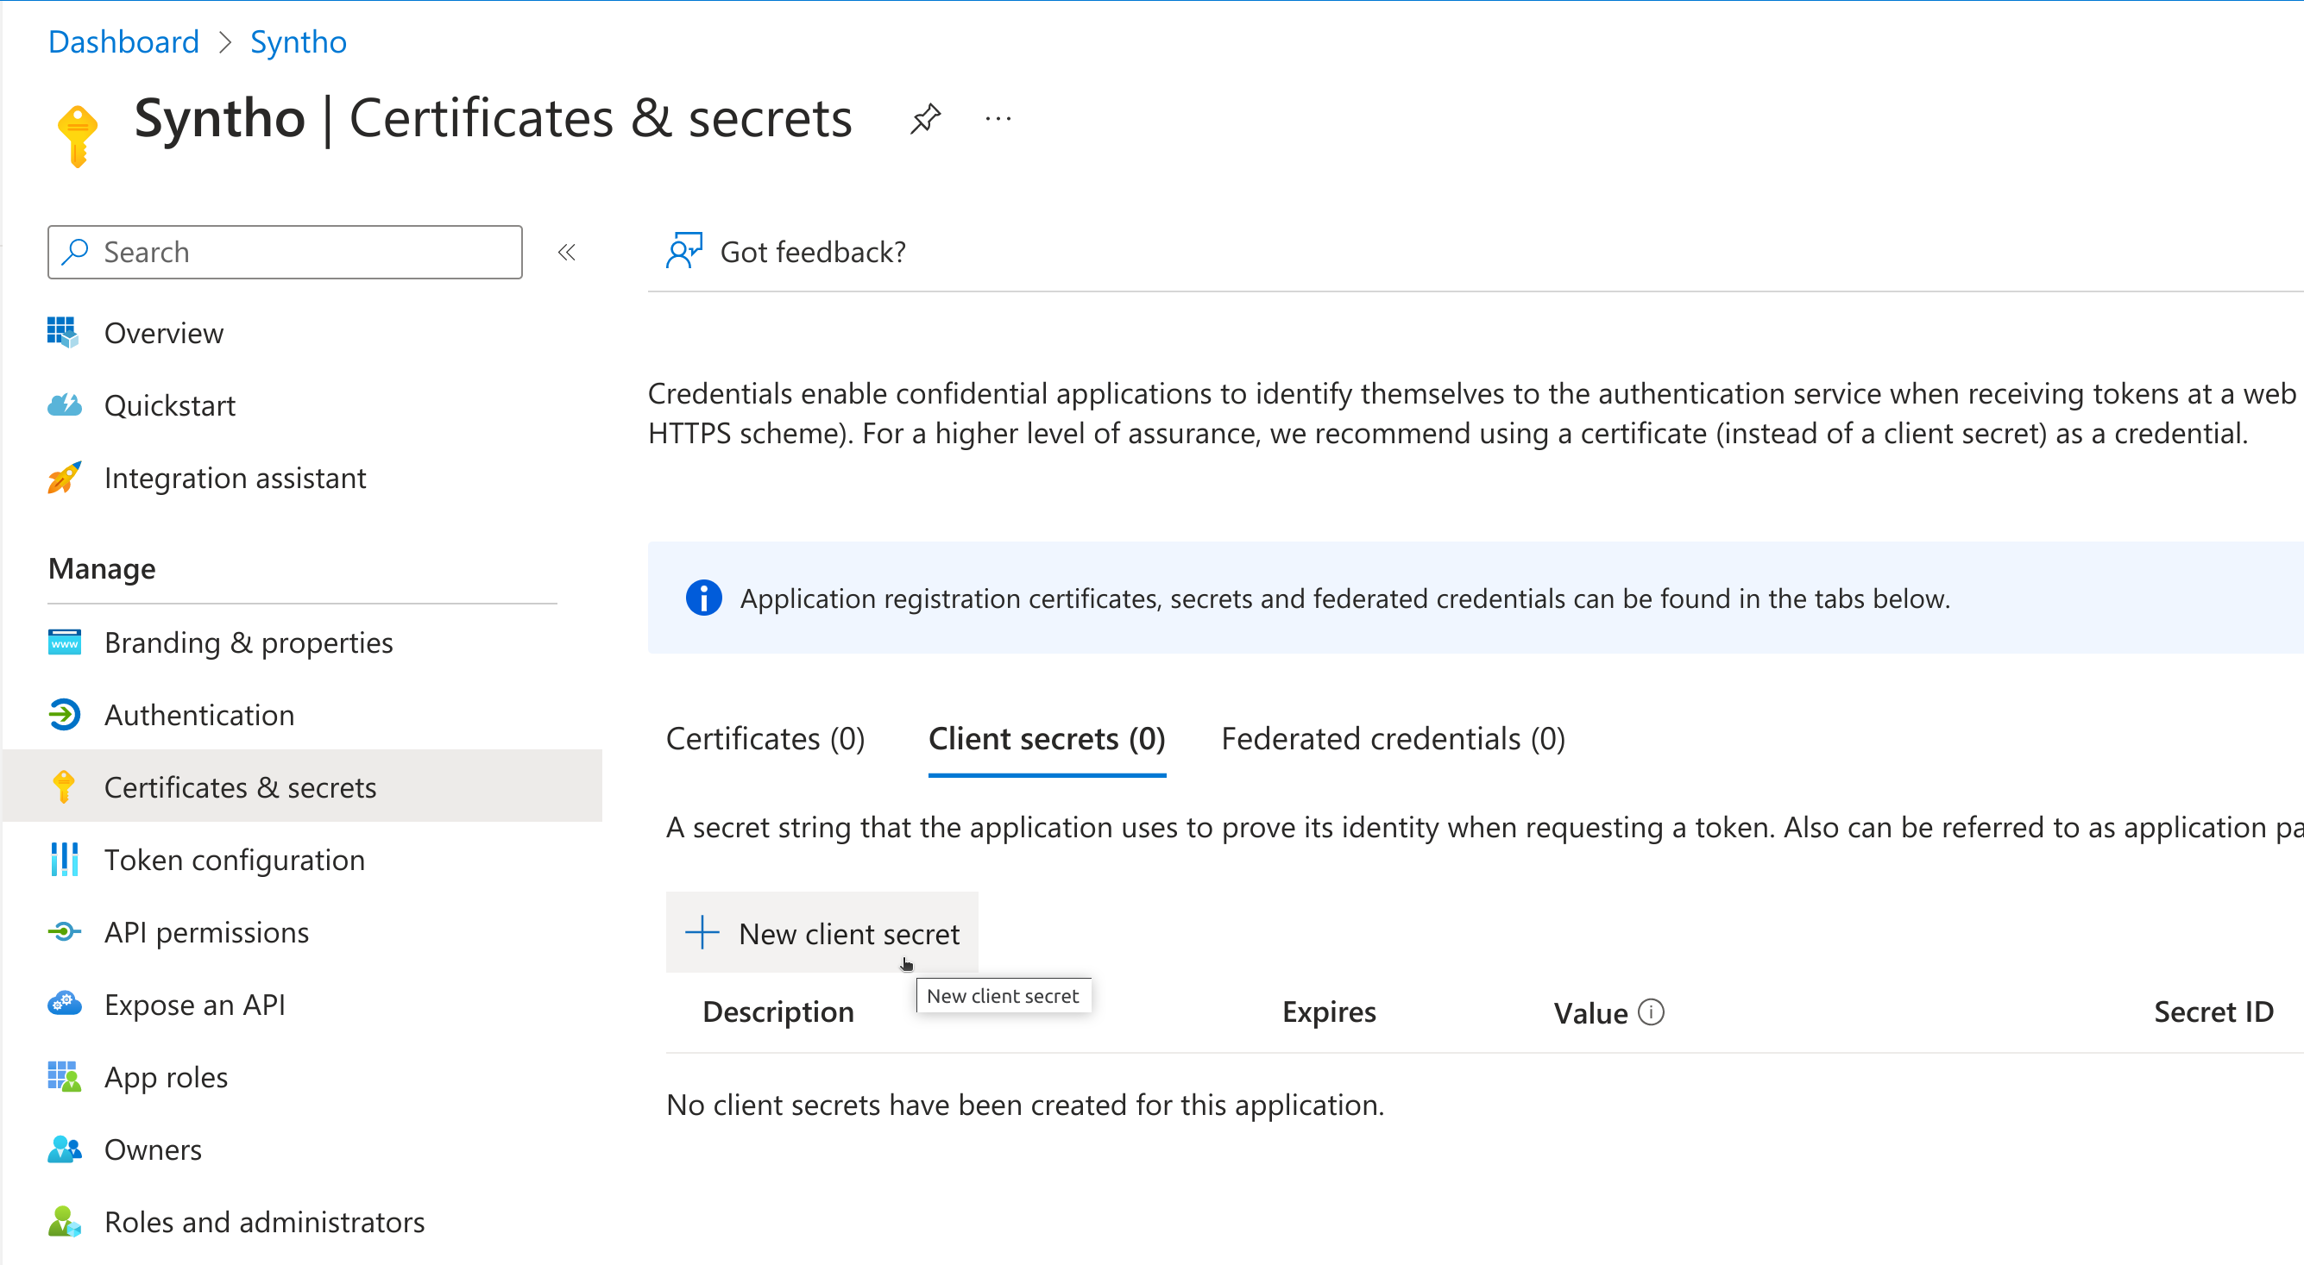
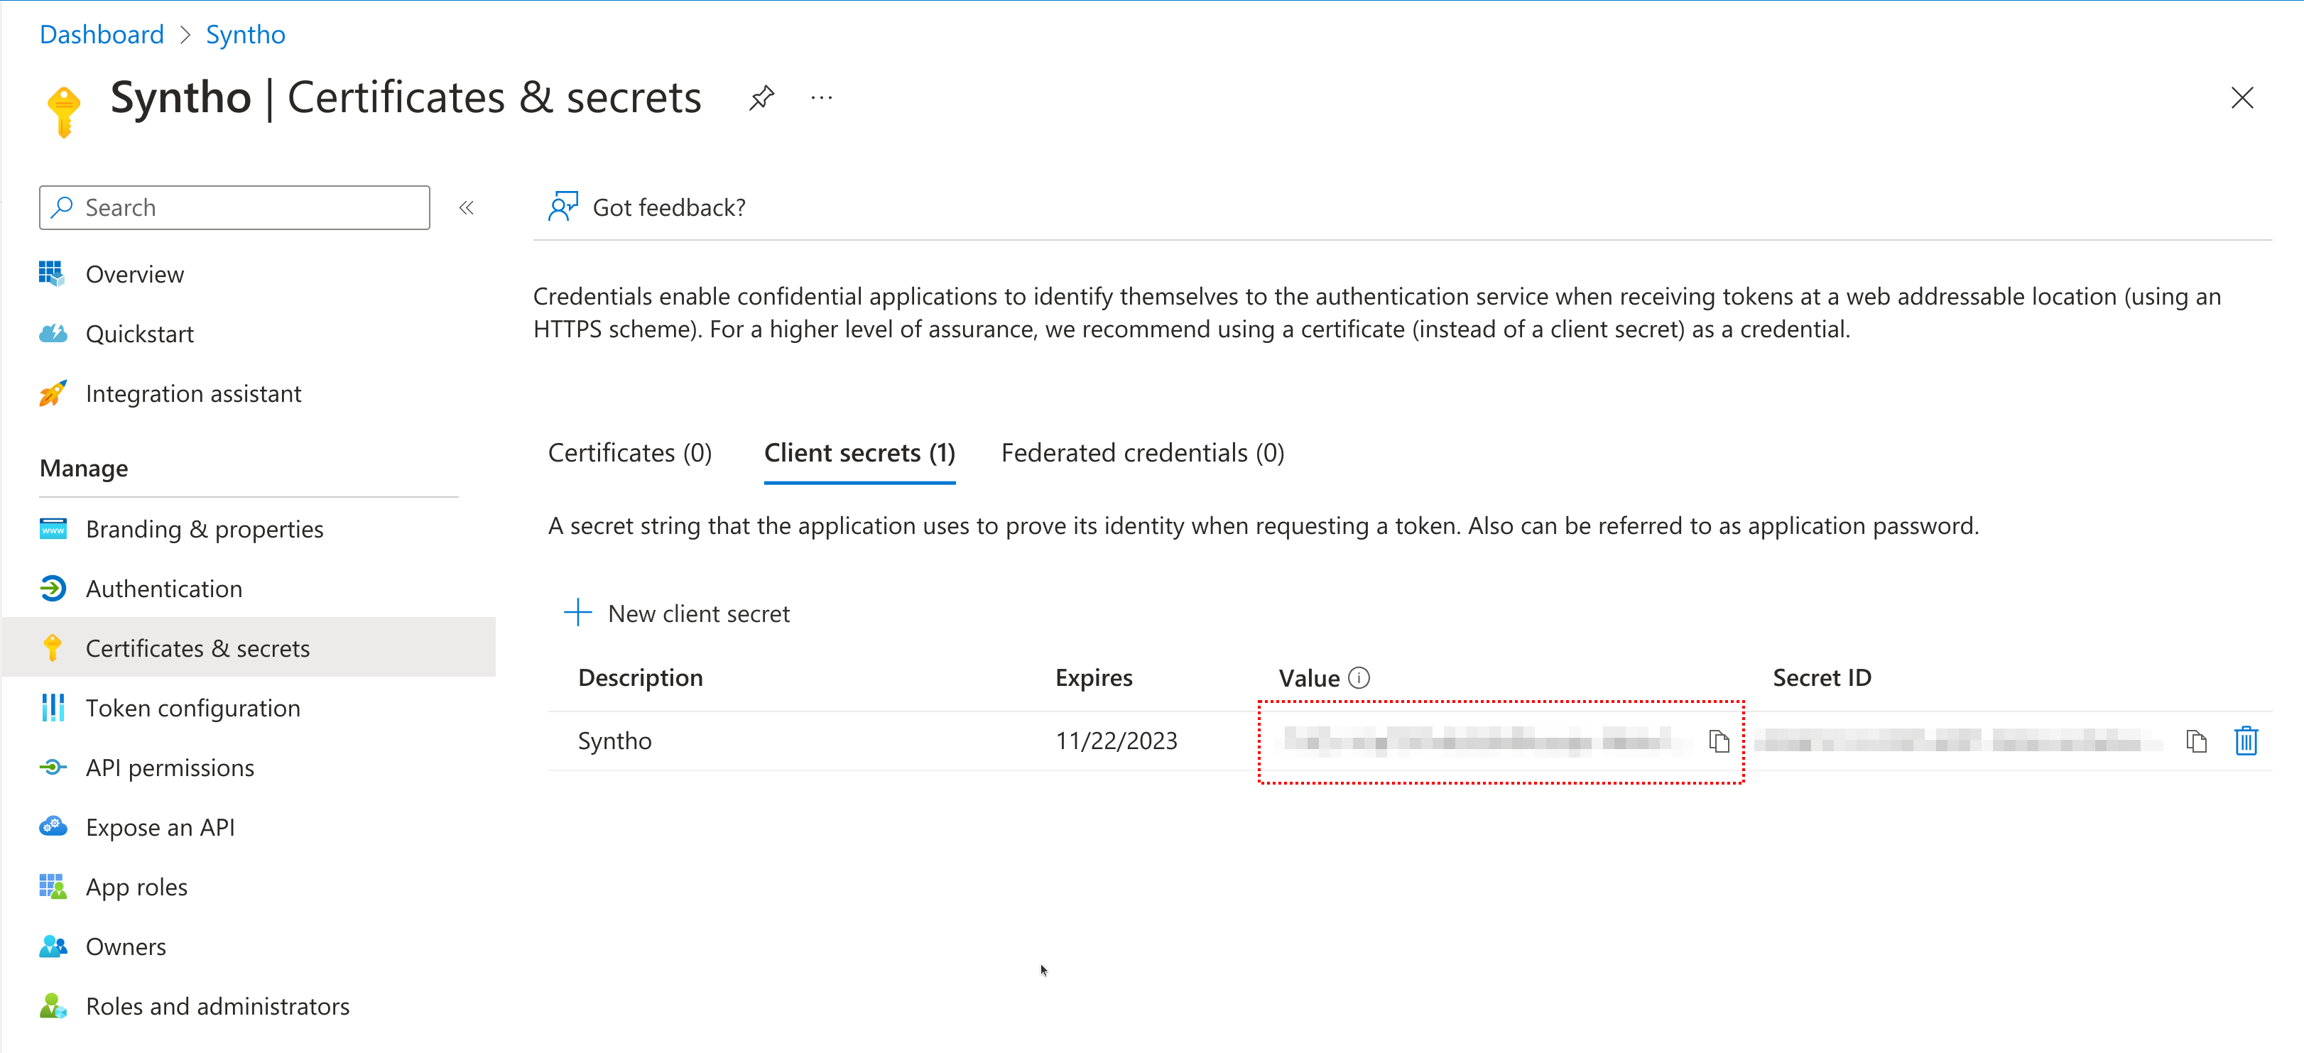
  1. Click on "Certificates & secrets", and select "New client secret". Enter a name, for example Syntho, select an expiration and click "Add"

  1. Copy the client secret value. This value will only be visible once. If you lost the value, remove the secret and create a new one.

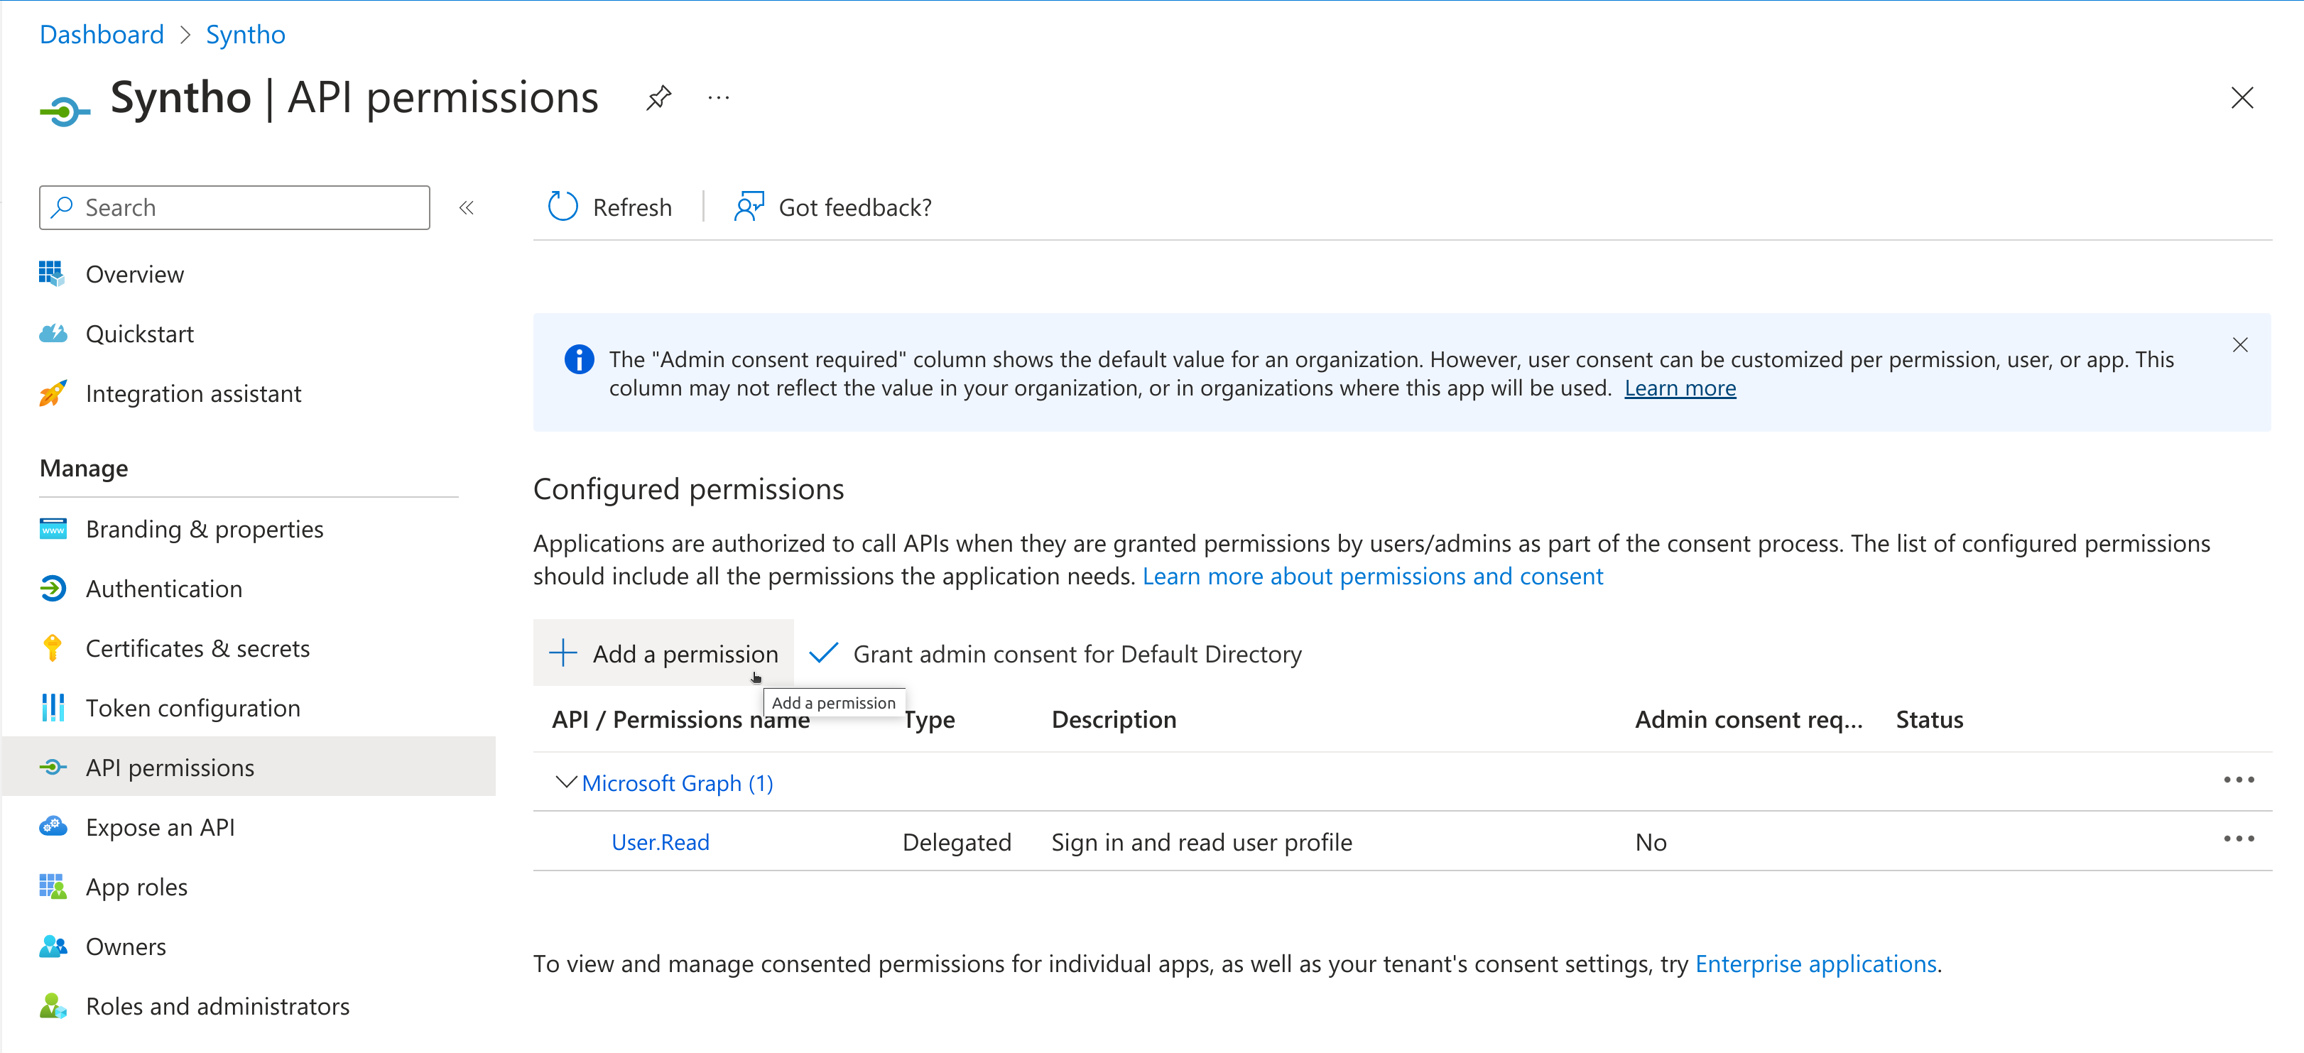
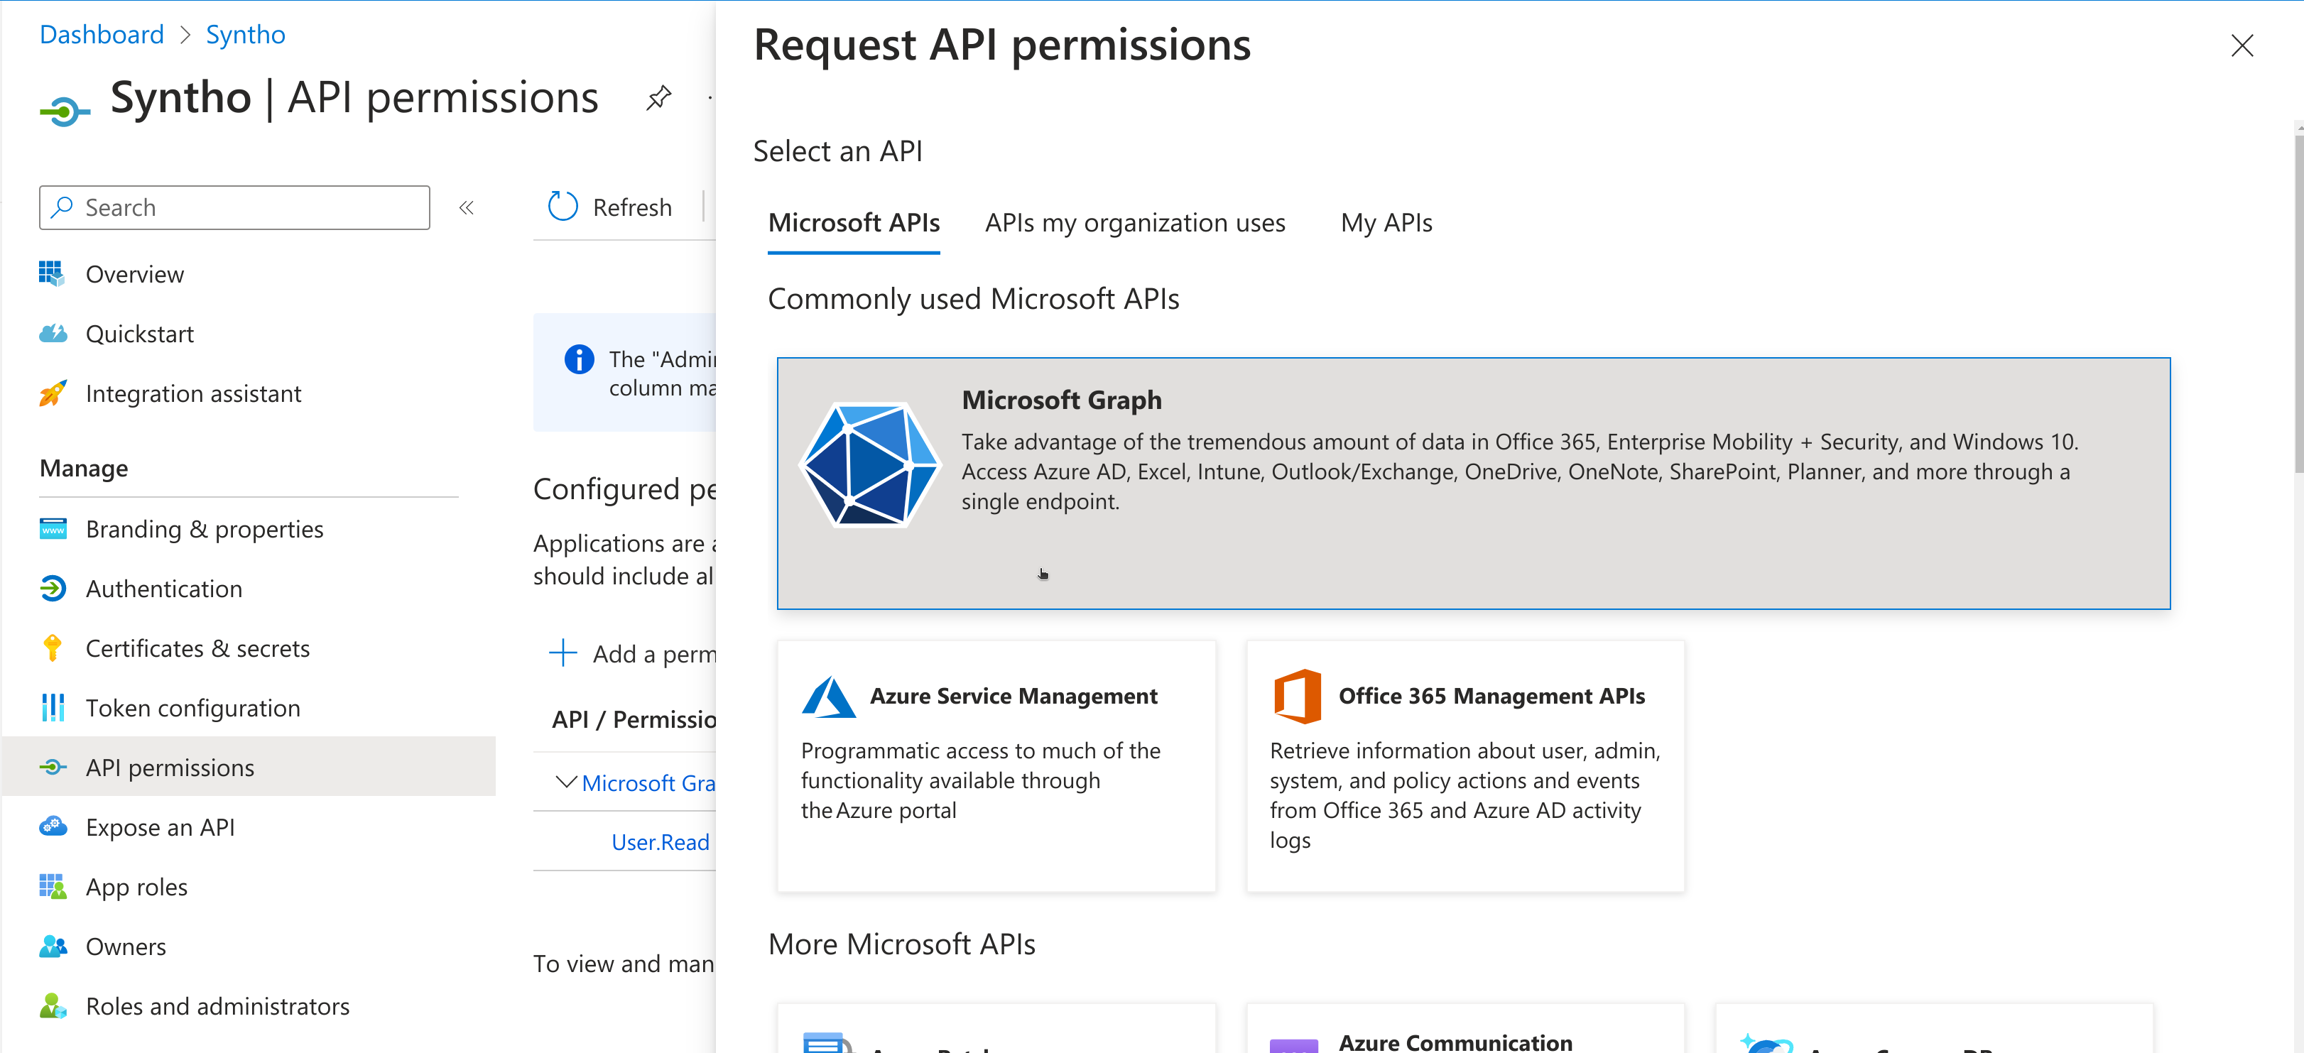
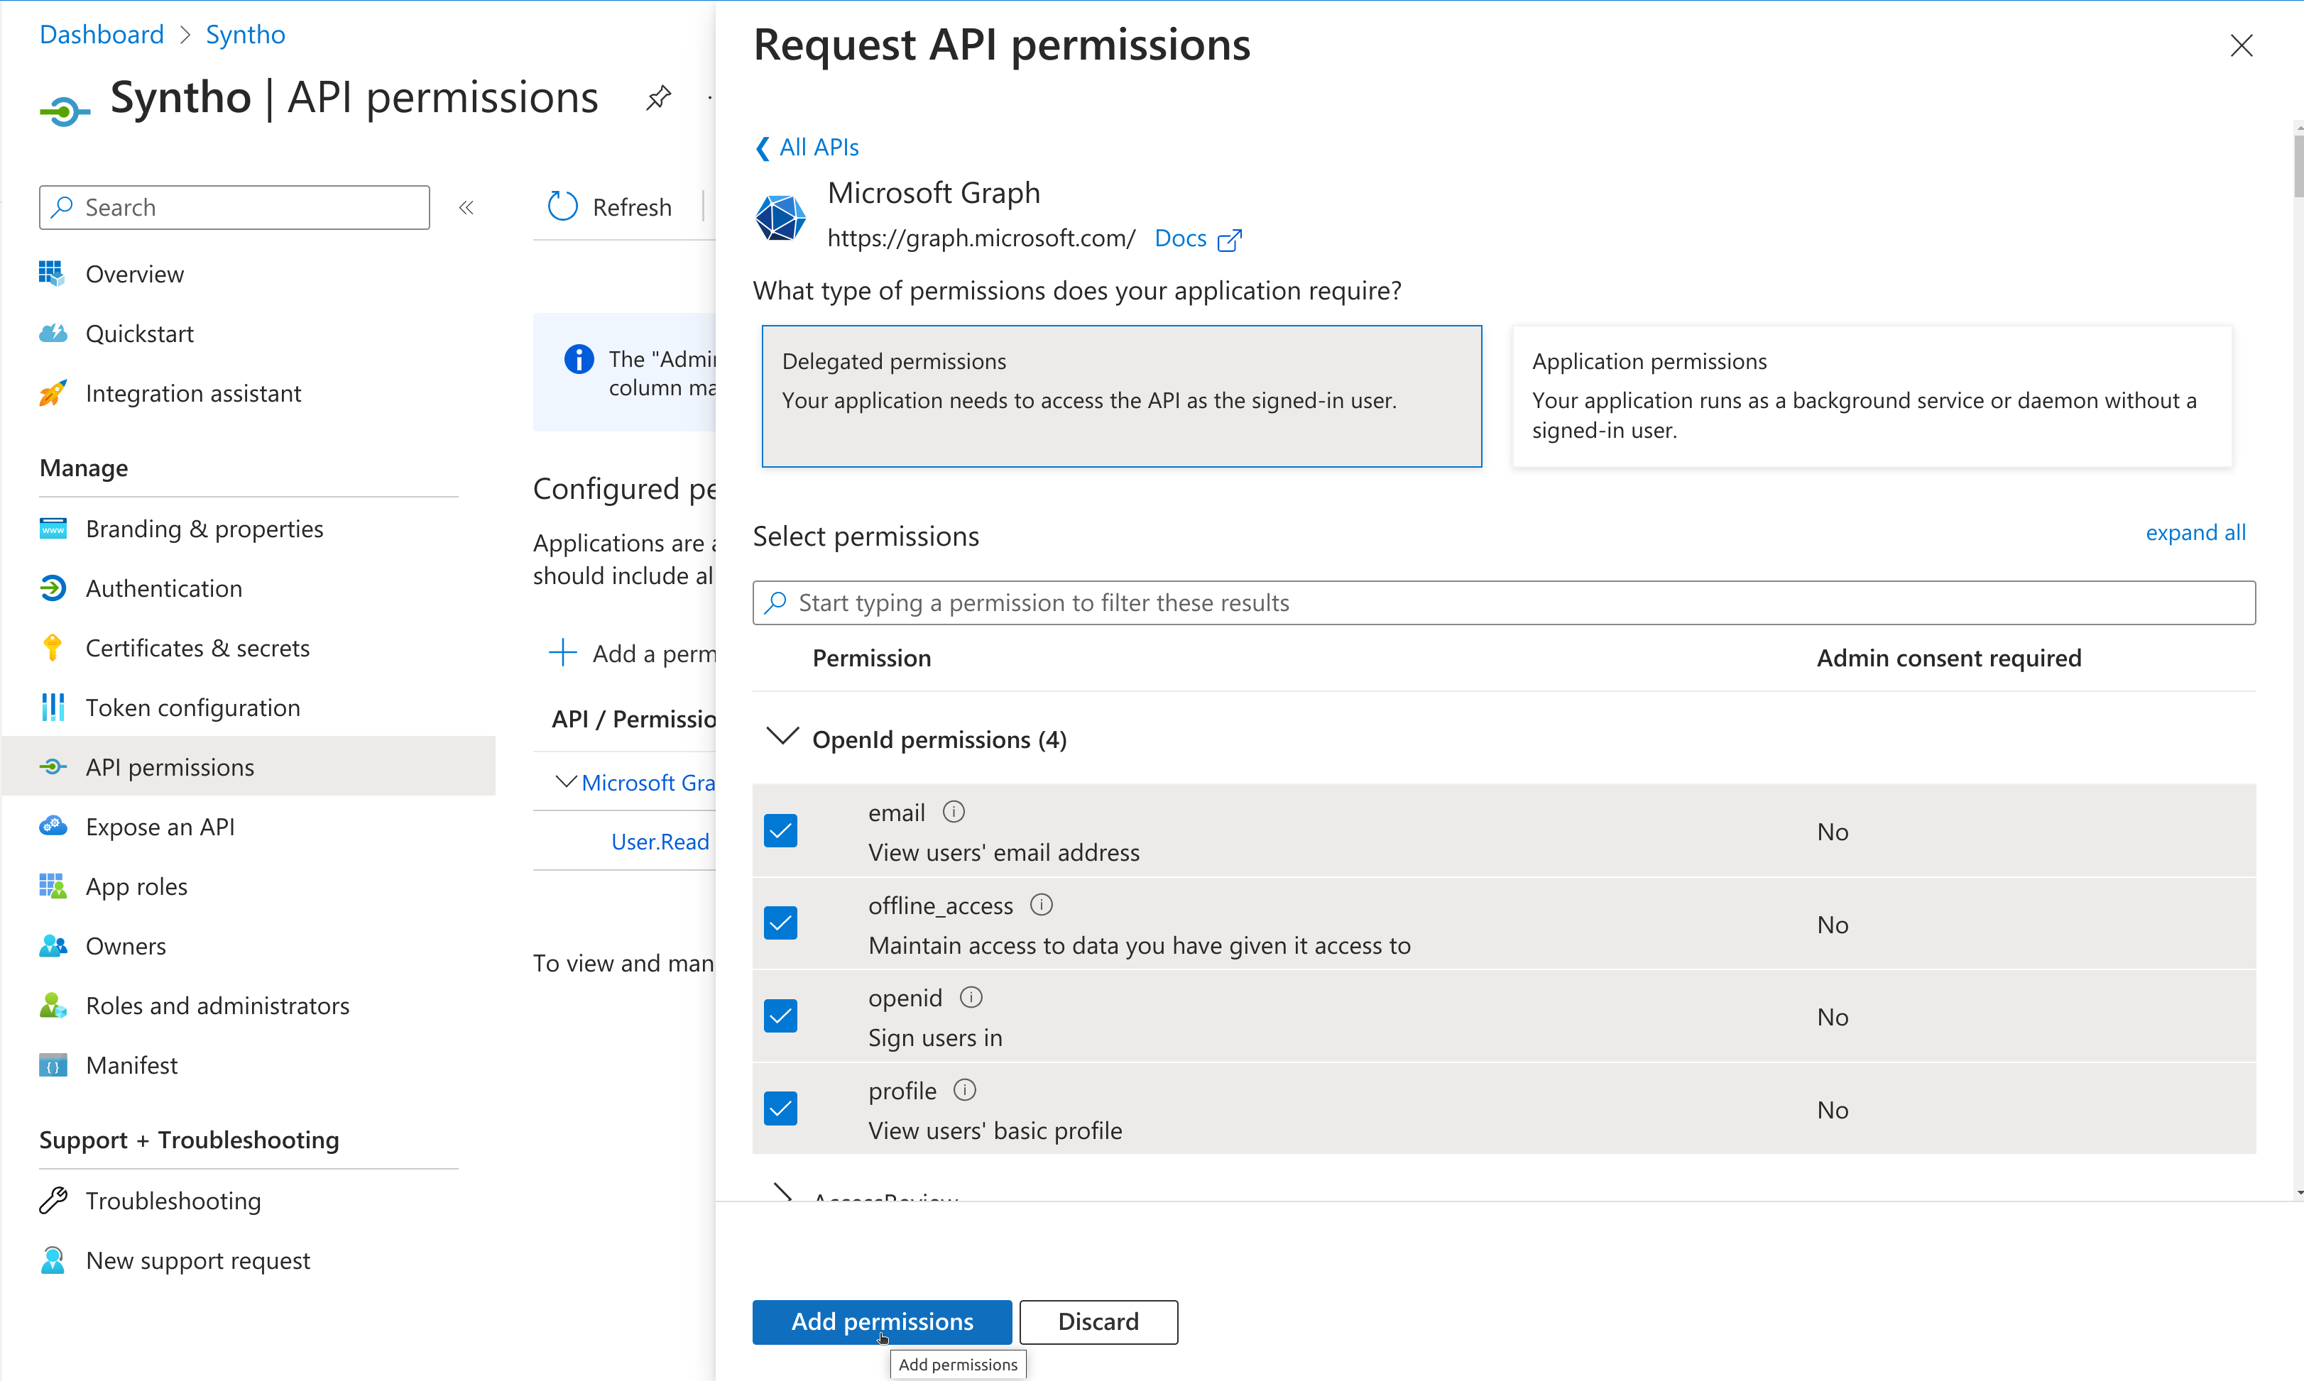
  1. In the left menu, select "API permissions", then click "Add a permission"

  1. Select "Microsoft Graph"

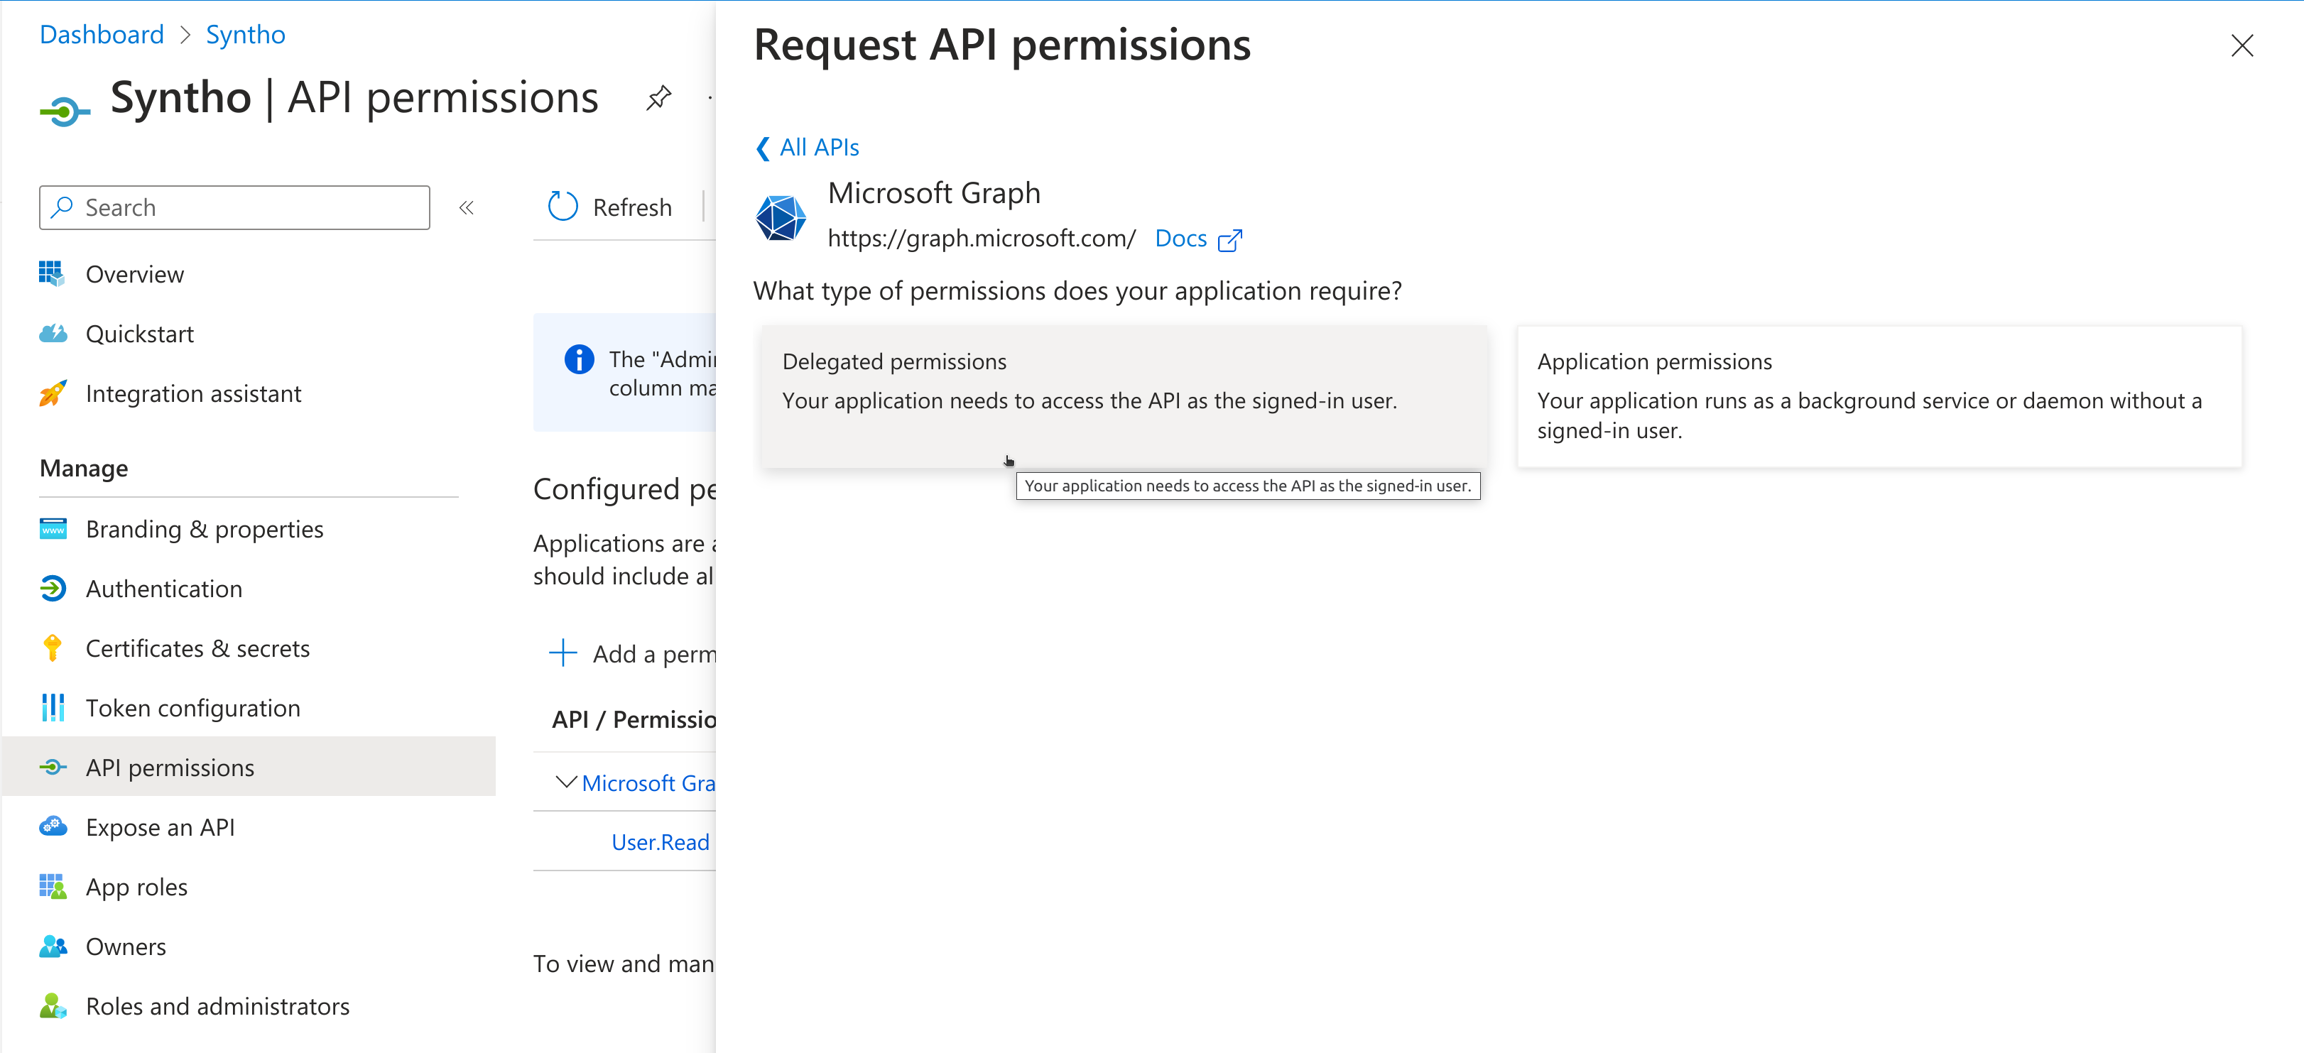
  1. Select "Delegated Permissions"

  1. Add the following permissions, then select "Add permissions"

  • OpenId permissions

    • email

    • offline_access

    • openid

    • profile

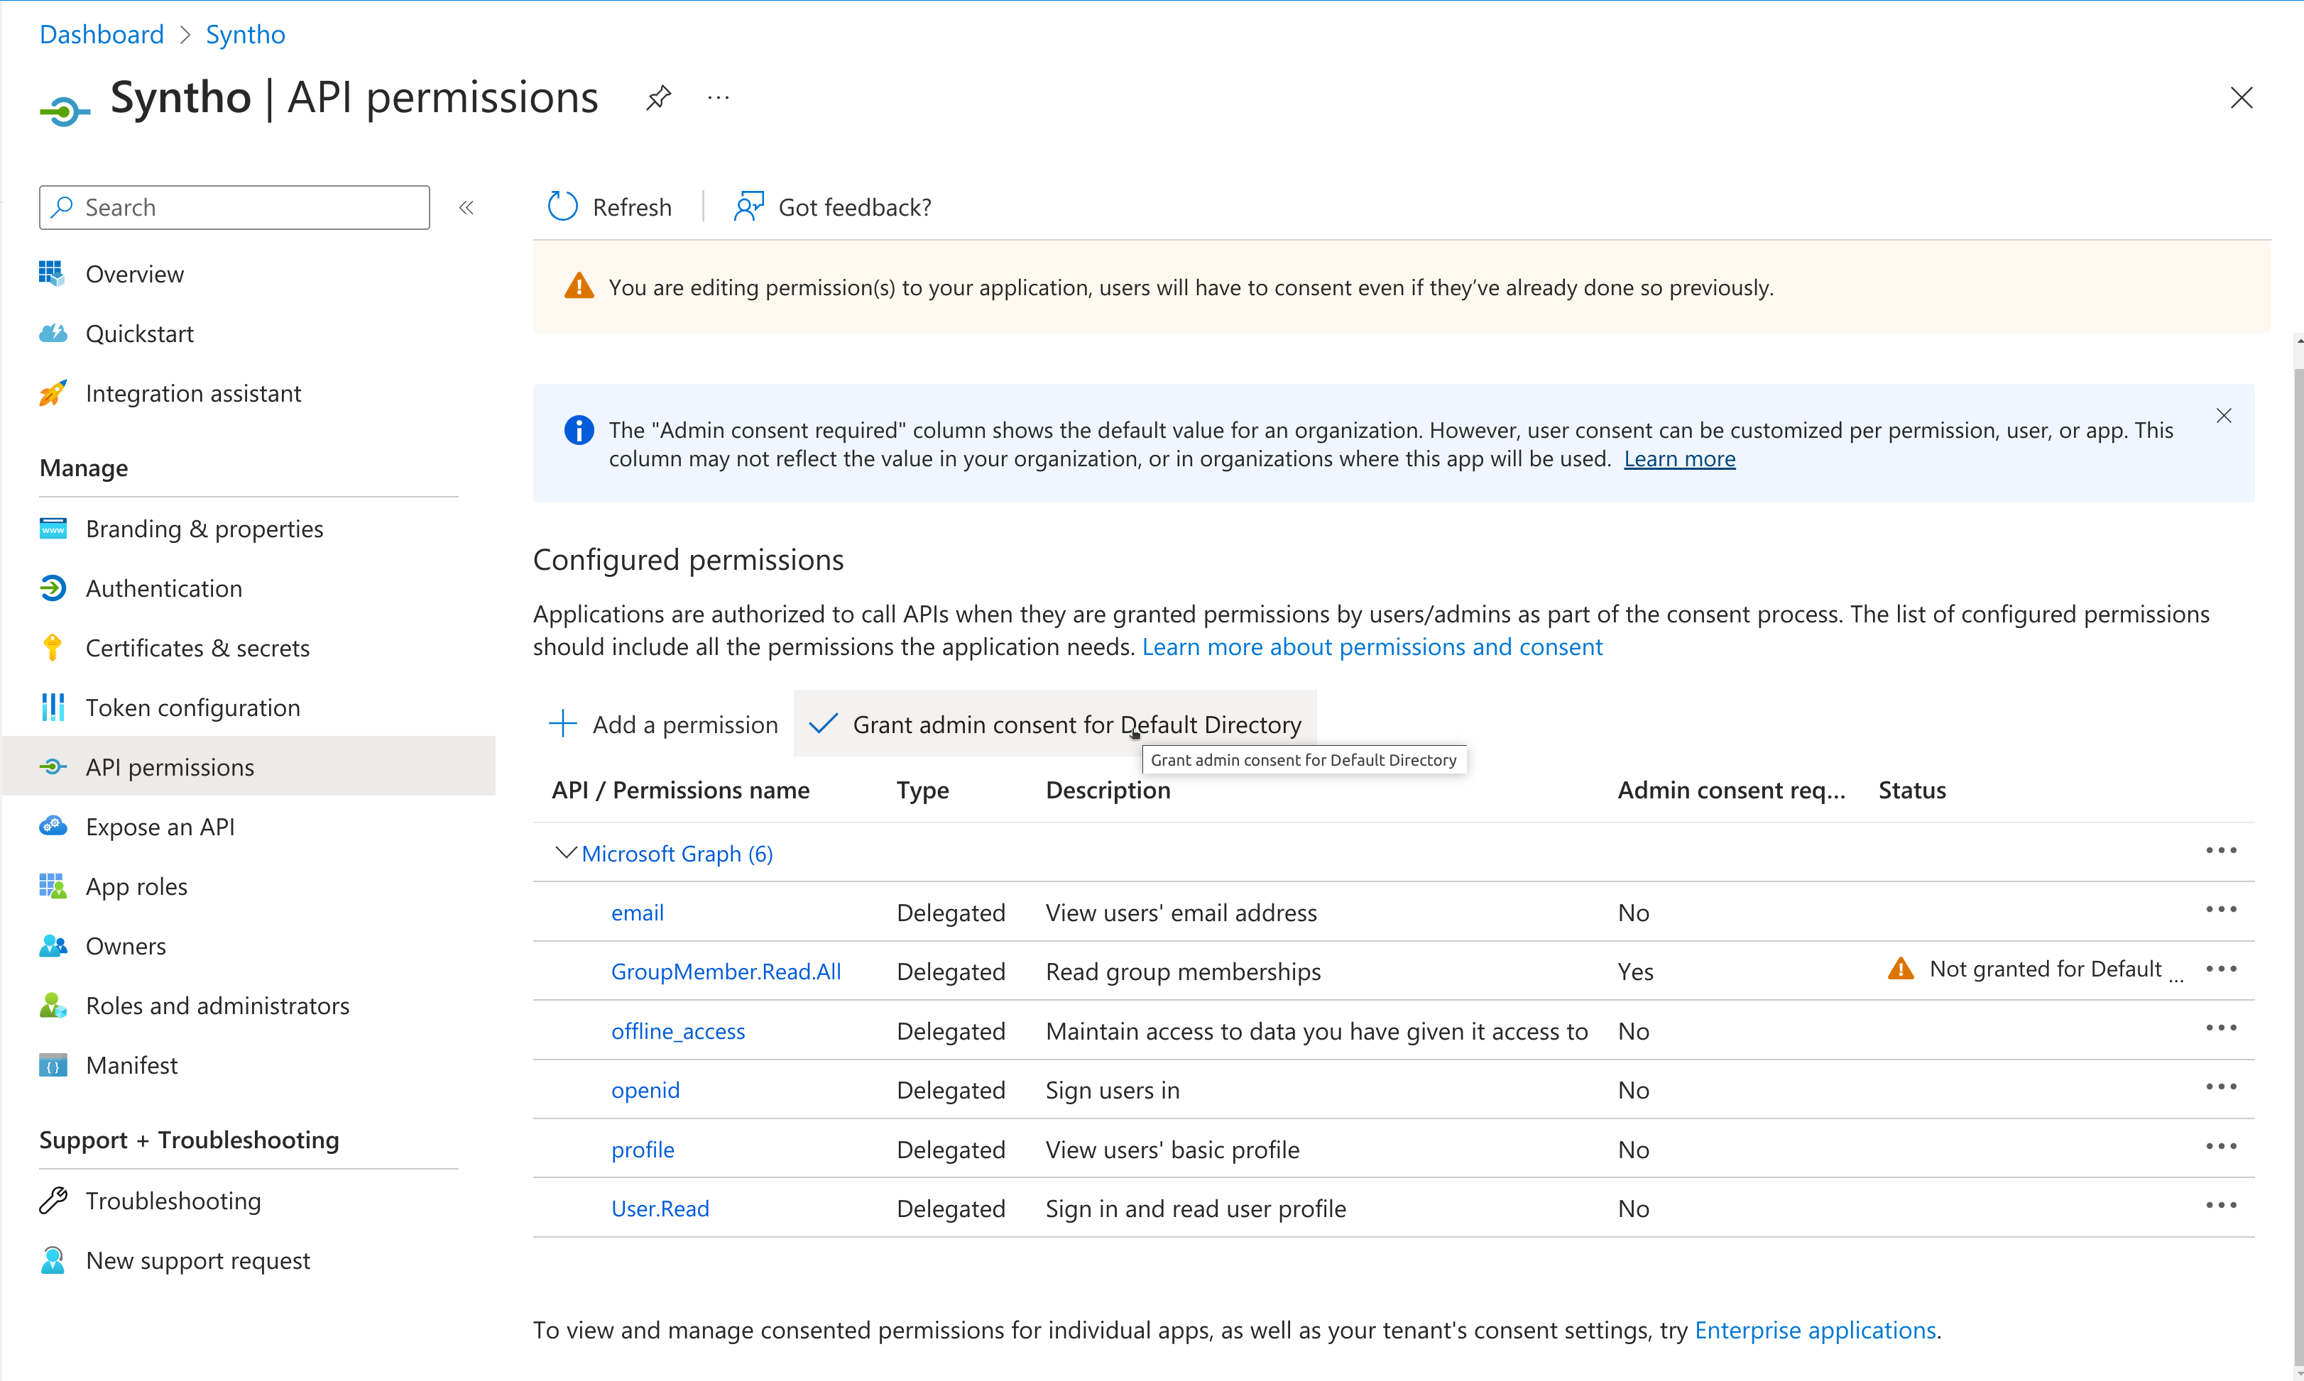
  • GroupMember

    • GroupMember.Read.All

  • User

    • User.Read

  1. Select "Grant admin consent for 'your directory'"

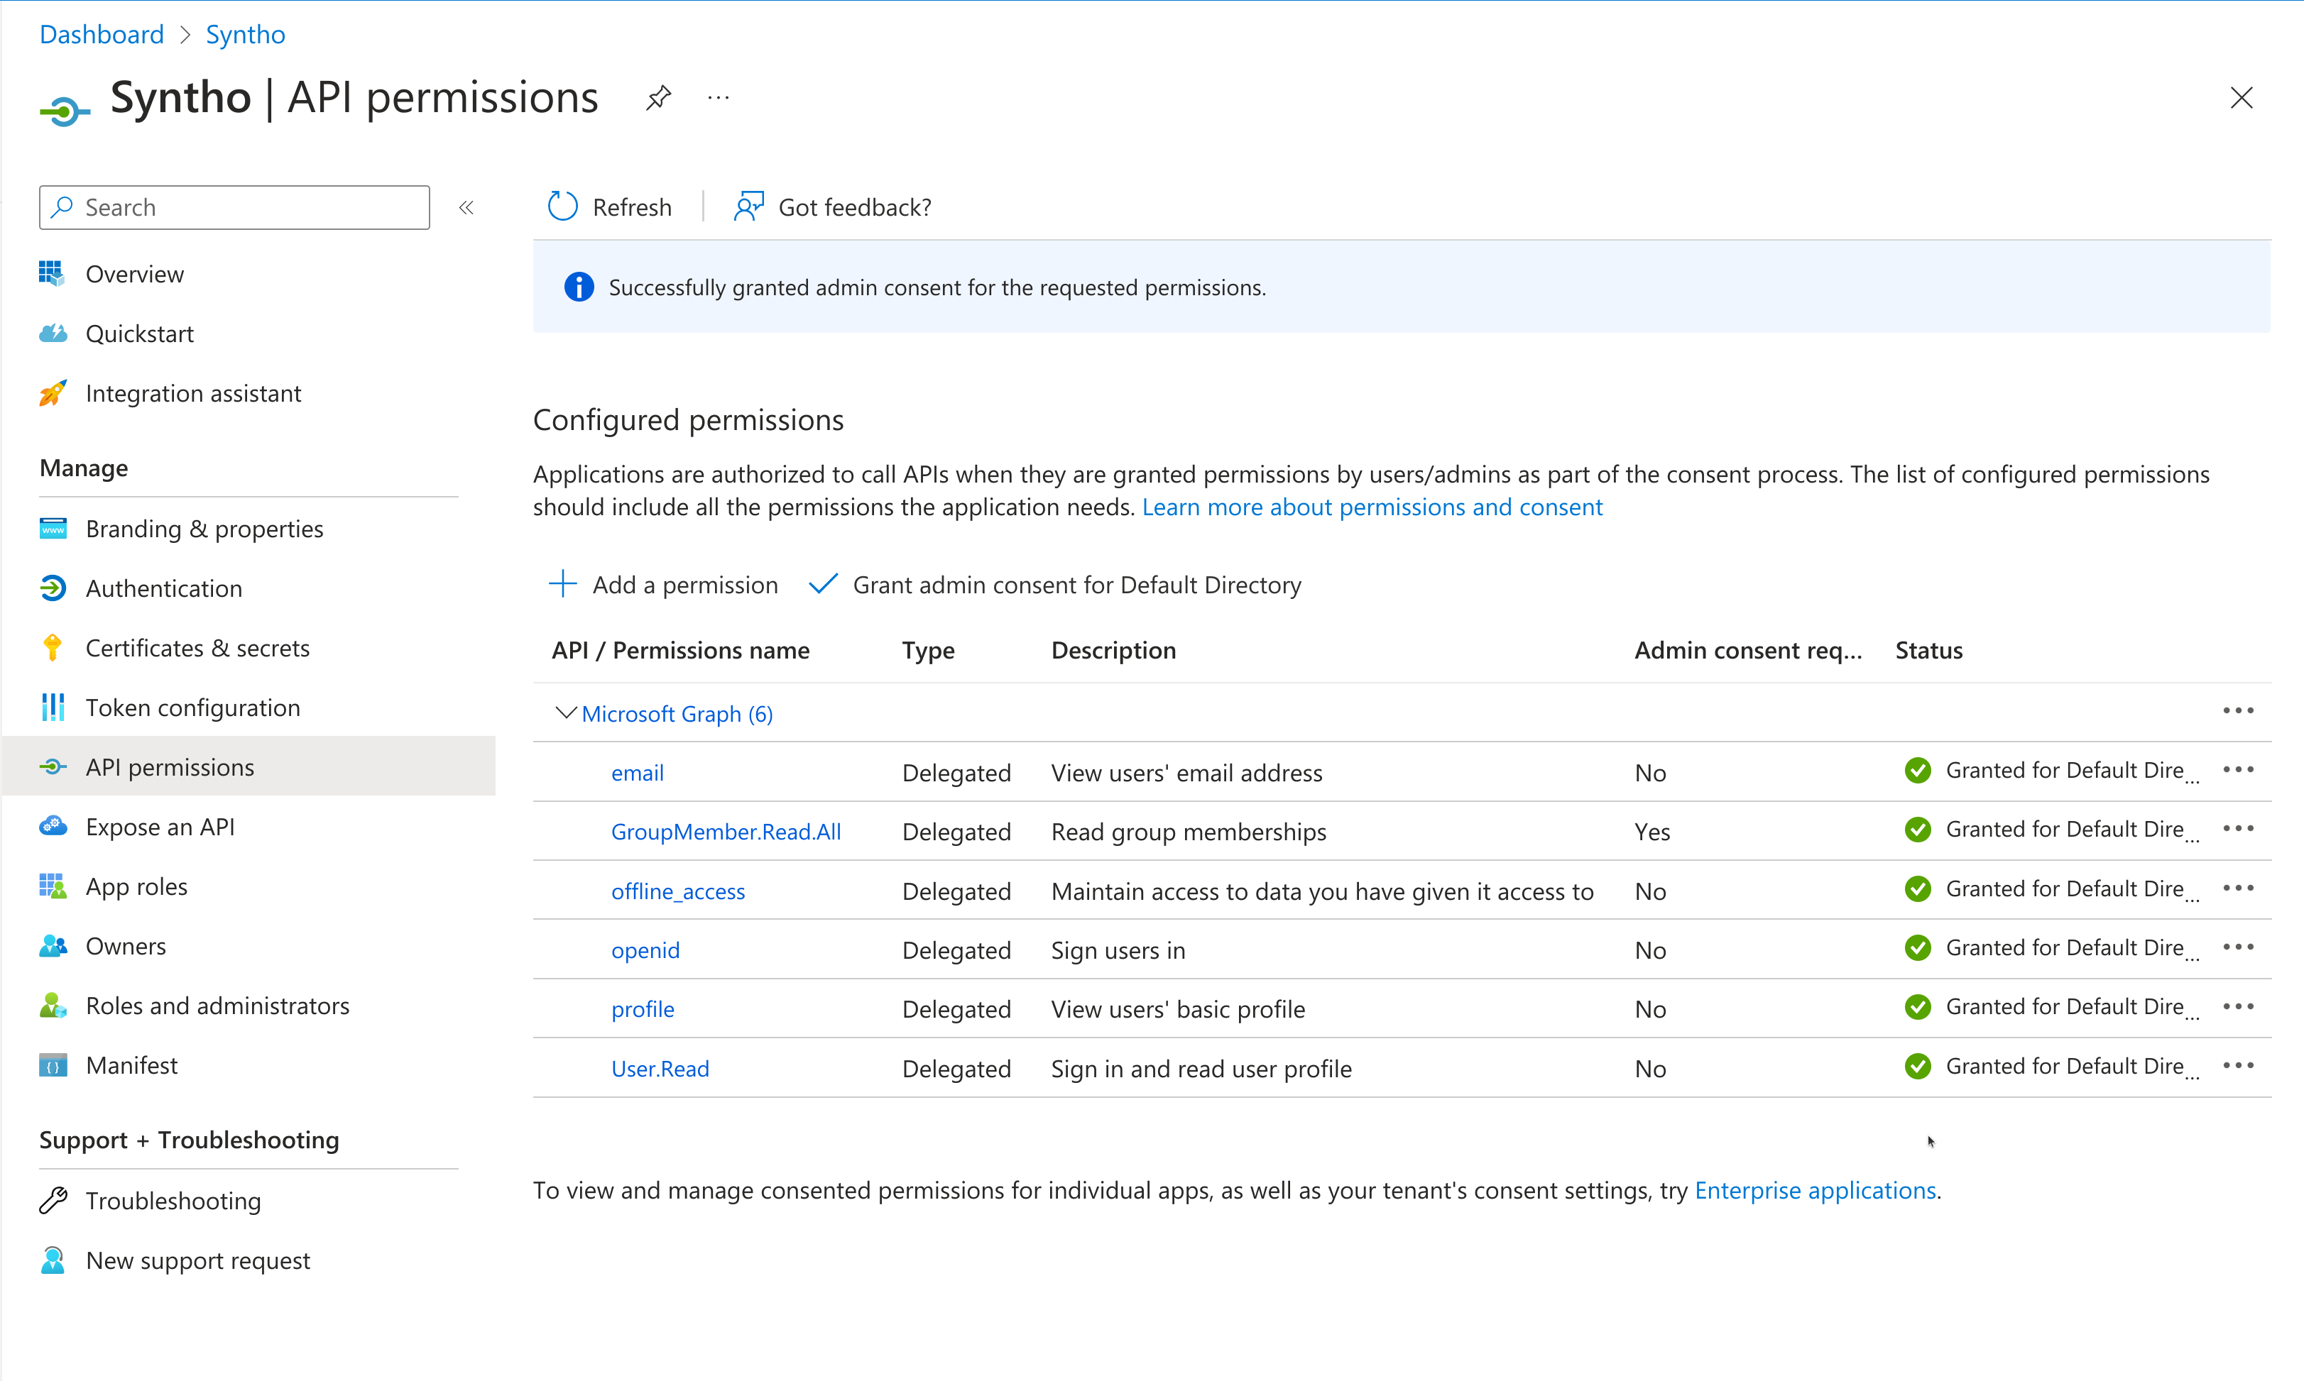
  1. After granting admin consent, all permissions should have a green checkmark.

After registering Syntho in Azure, set the following environment variables:

  • SSO_PROVIDER=Azure

  • SSO_CLIENT_ID=<Azure Client ID>

  • SSO_CLIENT_SECRET=<Azure Client Secret>

  • SSO_TENANT_ID=<Azure Tenant ID>

Groups

Upcoming feature

When your identity provider supports groups, these groups will be automatically created in Syntho when a user signs in using the identity provider. These groups can be used for assigning workspace permissions.

Groups coming from the identity provider can be filtered using the SSO_GROUP_FILTER_REGEX environment variable. When this environment variable is set, only groups matching the provided regular expression will be created in Syntho.

Administrator access

If Single Sign-On is enabled, users can become administrators by setting the environment variable SSO_ADMINS. This environment variable expects a comma-separated list of e-mail addresses. When a user logs in to Syntho for the first time with their Single Sign-On provider, if their e-mail address matches one of the e-mail addresses in the environment variable, the created user will become administrator.

Note that becoming administrator via this environment variable only happens on the first login and not on consecutive logins. This is to prevent needing to redeploy Syntho to prevent users becoming administrator again on consecutive logins.

Limitations

  • Limited Provider Support: Single Sign-On (SSO) is currently only supported for Azure Active Directory.

  • Scope of SSO: SSO can be used for logging into the Syntho platform but not for database connections. For database access, you'll still need to use a traditional username and password.

Being aware of these limitations will help you better understand the scope and restrictions of using Single Sign-On with Syntho.

PreviousManage users and accessNextManage admin users

Last updated 12 months ago

Was this helpful?

First, register Syntho as as an application in the :

Azure Active Directory Portal